Get started with your new airlogOne

When you unbox your new airlogOne, you will find the device,
a printed quick start guide, a USB-C cable and the important
Login Card. This card holds the unique login credentials for You and your device, both sharing access to your data in the firebase cloud storage.  
Your digital logbook, all your detailed tracks and the complete device configuration is stored here.

This is the detailed and current manual. It represents the current Software version.

airlogOne and airlogOne-mini share the same features and the same manual; only the part “truemotion sensor” is available for the airlogOne only.

Lets go!

SW Version: V1.62 + V2.0

quick user guide

what you need to know to use your airlogOne

Buttons and LEDs

airlogONE has no hardware on/off switch (see notes). The device can be switched ON by pressing the MODE switch shortly. It switches OFF after 2hrs not used / no button pressed / not airborne or by releasing the MODE button in the MODE cycling menu at “SHUTDOWN“.
In sleep Mode, the unit keeps the last GPS data to Hotsync with GPS after switching on again.

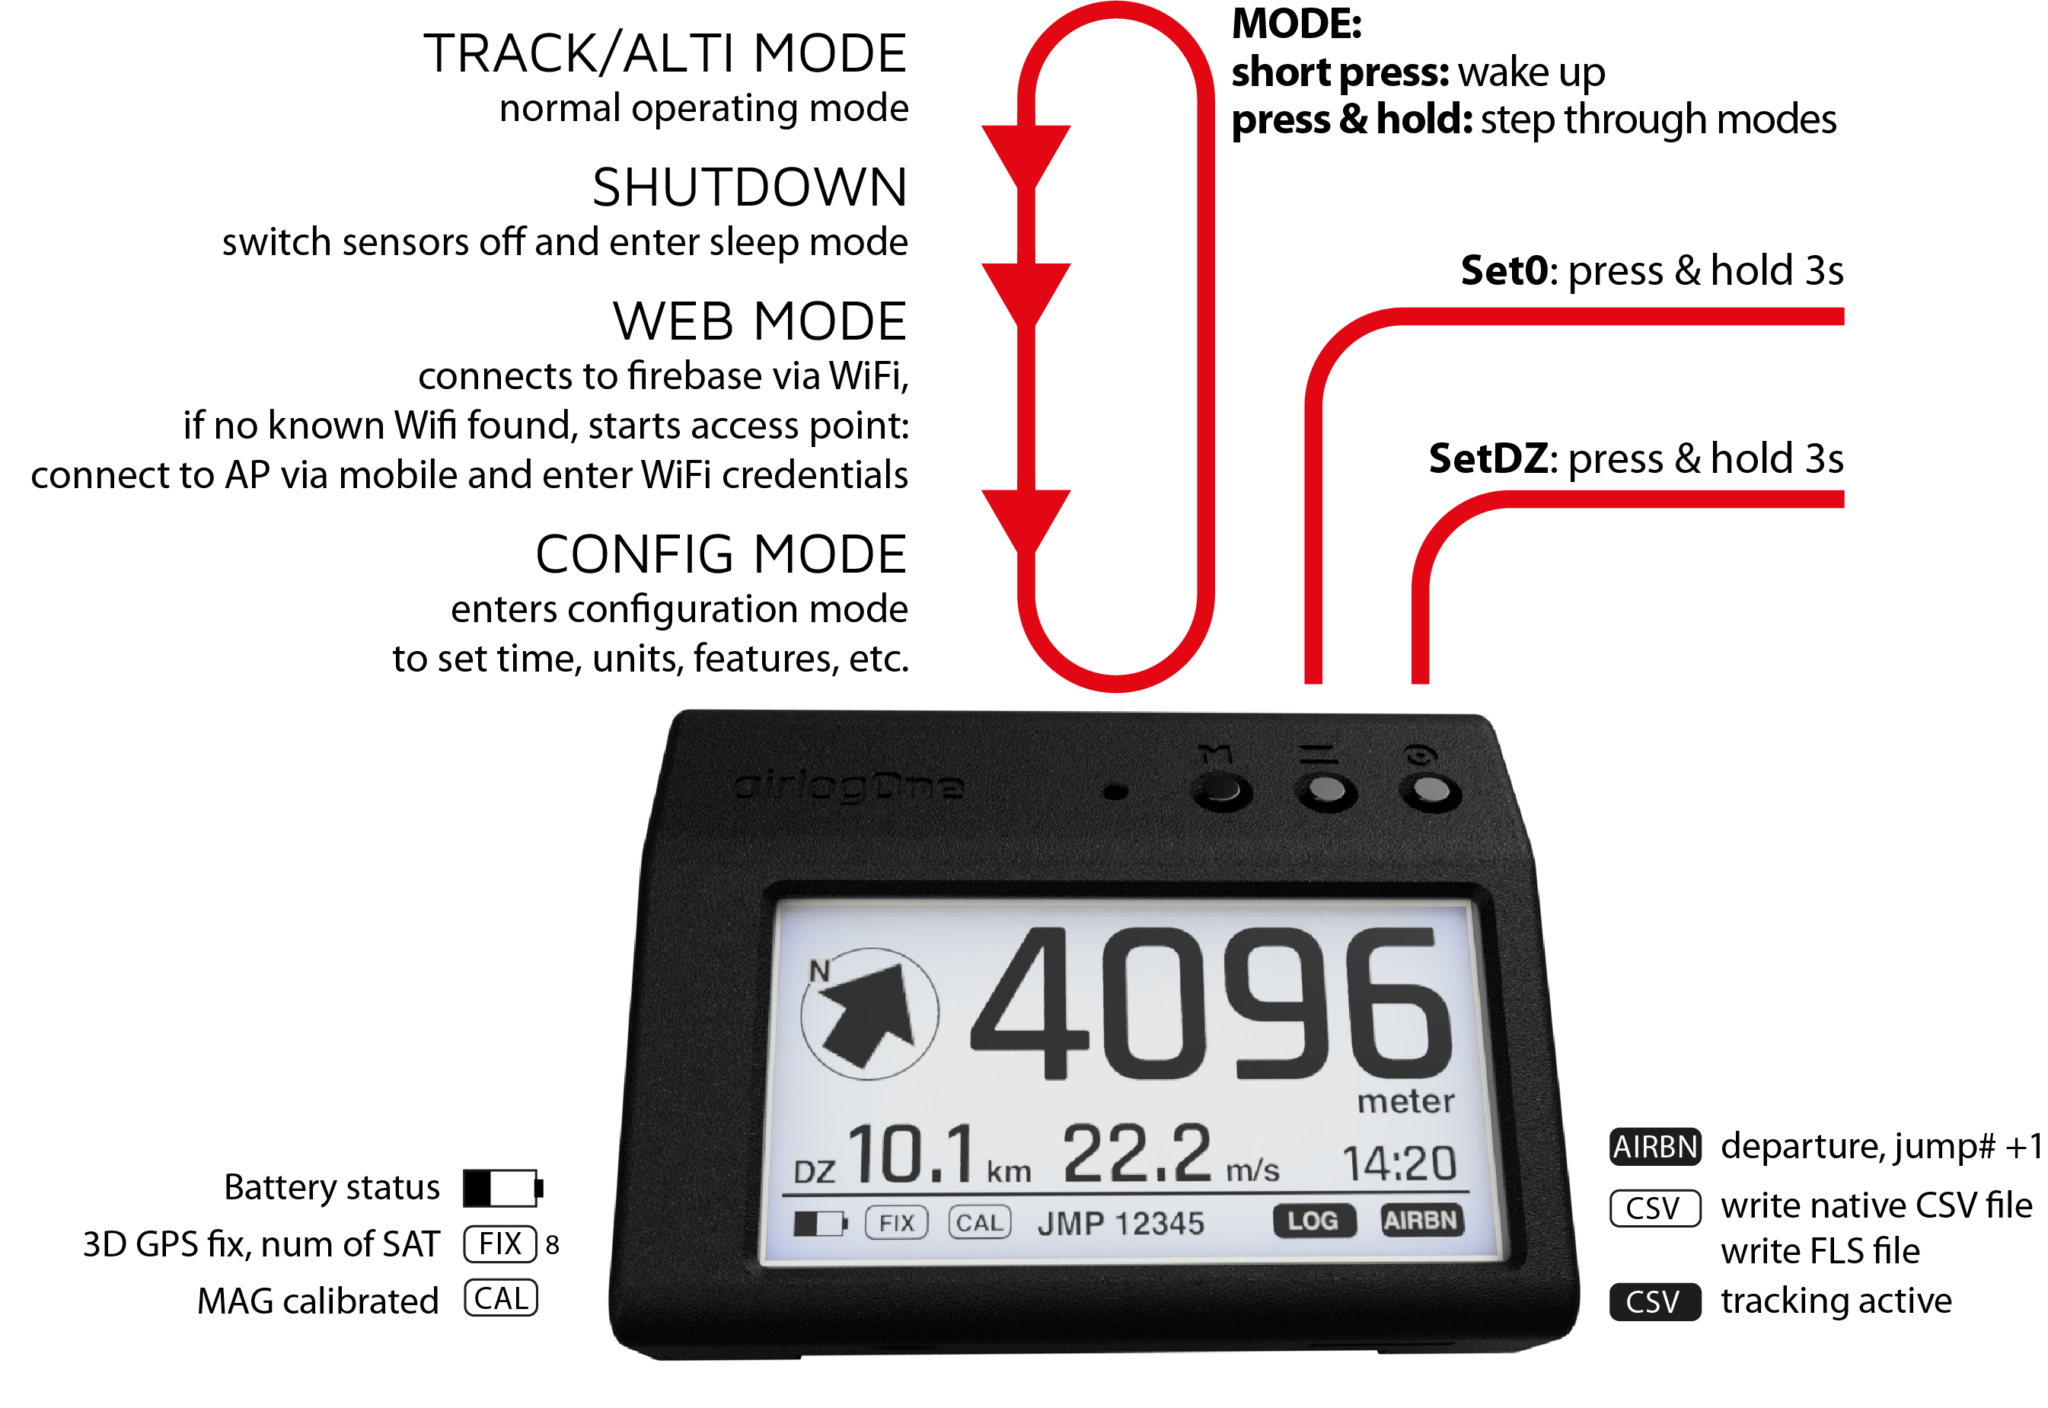
MODE

  • press&hold cycles trough the operating modes: ALTI – SHUTDOWN – WEBMODE QUICK-CONFIG – OTHER SCREEN MODES… – ALTI_DEMO.
    The mode button will not work anymore once you’re in the air (>25m/75ft)
  • If pressed >2s when AIRBORNE, logging is started
  • If pressed >2s while LOGGING, logging is stopped

ALT-0

  • press >2s sets ALT to zero (on the ground only, not working >50m/150ft)
    If Airborne, pressing >2s starts logging manually if pressed during start-up phase.
  • Pressed during the boot process skips waiting for GPS

SET-DZ

  • press >2s sets the current position to HOME.
  • If pressed >2s while logging, a position marker is set

MSG LED

  • blinks once each second if unit is in normal operation

CHARGE LED

  • (next to USB) to charge, use the USB-C cable. Full recharge will take approx 4 hrs. Recharge before your jump weekend. Green marks fully charged.

Operating the airlogOne

The airlogOne is operated using the three buttons above the screen. They are labeled with symbols: M for MODE, Alt0 for setting the zero display for the altitude and SetDZ for setting a target point (HOME).

To switch on, briefly press the M button. The device restarts, performs a self-test, measures the air pressure, sets the altitude to zero and starts GPS reception. Waiting for at least 4 satellites can be skipped if the middle button is held down until the beep. For the first GPS fix, go outside and have a clear sky view.

The SetDZ or Alt0 buttons must also be held down for 2 seconds before they are triggered. This function is deactivated above 25m / 75ft.

If the M button is held down, the various functions of the device are run through. These include switching off (SHUTOFF), Internet access (WEBMODE), configuration (QUICK CONFIG) and the various discipline screens. A short beep sounds each time the display changes. Then release the button to select the function.

Soft-Reset: Press and hold both outside buttons (“M” + “SetDZ”) ca 3 seconds – the unit will restart.

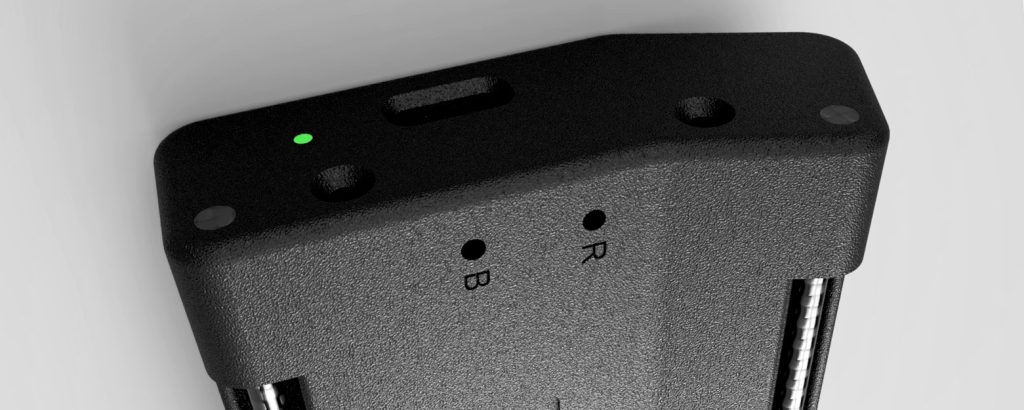
Hard-Reset: Devices HW2.x on have a hardware reset button, located on the underside of the unit, marked “R” / close to the bend of the case: Insert a pin <2mm (open paper-clip) and press the button.
NOTE: The hole marked “B” is only used for special software updates, has no function otherwise.

Resetting is normally not necessary, as each wake-up is like resetting the device, all sensors are re-initialized, etc. Soft reset can be used to resolve a stuck screen, f.i. waiting for an internet connection or stopping a config without saving.

The large 2.7-inch / 2.2.inch electronic paper display shows all relevant information at a glance.

Note that the display is not self-luminous, so it is not readable in the dark. However, the readability in daylight is excellent and completely independent of the viewing angle! Polarized glasses are no problem!

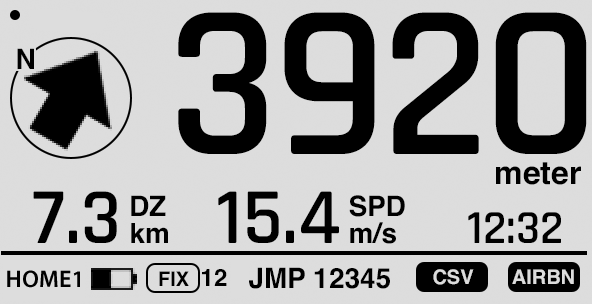
The altitude is displayed m/ft-accurate in large digits. Next to it on the left the direction to the landing site is shown.
In the line below the distance to the landing site, GND speed and time are displayed.
In the bottom line you will find the currently selected target, battery and GPS status, the current jump number and a status display of the logger. The screen is updated twice a second (Software 3.x)

E-Paper Display

Symbols:

The top/left dot is changing with each screen update as a life sign.

FIX signals a valid 3D GPS fix. If less than 4 satellites are received, a “no GPS” sign is shown. The adjacent number shows the number of active satellites.

CSV describes the logging format, it is airlogOne native format. If no CSV is displayed after switching on, a functioning uSD card is not inserted.
If the CSV is displayed in white on a black background, LOGGING has started. The same applies to the FLS compatibility data format

AIRBN indicates the airborne status. After the start, the “preliminary” AIRBN symbol appears first, where the time and location for the jump log are recorded. If at least 500m are reached within 10 minutes, the device switches to AIRBORNE status, the jump counter is incremented and logging can begin at the desired altitude. This symbol is AIRBN on a black background

quick config screen

the new QuickConfig screen is used to quickly configure the airlogOne on the go. As before, the detailed configuration with all options is done via the airlog.app dashboard.

In principle, the settings are self-explanatory. They include

  • Timezone: as UTC +/- x (The time zone is set automatically if GPS reception and Internet access are active)
  • Autostart: trigger altitude to start detailed track recording
  • Alti Units: Unit of altitude display (all other units only via airlog.app)
  • Refresh: time until the refresh cycle, which maintains the screen contrast in strong sunlight. This option has been deprecated in SW V3.x
  • FLIP: rotates the image 180 degrees for attachment to the chest strap

second page

  • Track type: CSV is the native format of the airlogOne that contains all data, FLS is the compatibility format for a Flysight 1 analysis workflow
  • Wind Info: allows the recording of the altitude-graded wind forecast if the device is set to “WEBMODE” = Internet access before the jump. This selection is only available in CSV mode
  • Active Target: Selection of one of the 5 saved targets, which are retained even after the device is switched off and are shown in the display with a name abbreviation
  • Screen Mode: Selection of the start screen after switching on, normally “ALTI/TRACK” but also any of the discipline-specific screens
    – CP altitude: Height of the virtual 3D target point for the HOME position (set with the SetDZ button)
  • SAVE config in non volatile storage

The user interface is based on three buttons: UP (left) OK (center) and Down (right)

  • UP increases the displayed value
  • OK confirms the value and jumps to the next configuration step
  • DOWN decreases the value

The action is activated when the button is released.
If the OK button is pressed for longer than one second, it jumps back one configuration line.
Each press of the button is signaled by a short tone.

All configuration lines must be scrolled through until the new configuration is saved. After saving, the airlogOne restarts with the new configuration.

The configuration can only be canceled by a reset: press and hold the left and right buttons simultaneously for approx. 3 seconds. The device restarts without having changed any entries.

Remote Target Feature

The new remote target feature allows you to save up to five named targets in the device

Each target consists of four pieces of information: a short name (up to 5 letters), the latitude (LAT) and Longitude (LON) in degrees.decdegrees plus the altitude in meters.

The geographical data can be measured using GPS or simply read from an online map (Google Maps) by placing a point on the map.
This data is entered in the airlog.app under Device/airlogOne/REMDZ.

The active target can be selected on the website (transferred with the synchronization) or selected and checked in the device configuration.

On the normal Alti/Tracker screen, guidance is provided by means of a direction arrow in relative bearing, i.e. relative to the current direction of flight (therefore read the device in the direction of flight, e.g. hold it in front of your chest) and display of the distance to the target together with the current speed over ground.

Using the altitude

ATTENTION: during experimental mode, the target altitude entered in the airlog.app is not taken into account. The altitude display is based on the air pressure at the starting point and may not match the altitude at the destination.

Only when using the CP screen, the altitude is used for the destination approach.

It is planned to adjust the altitude display to the altitude at the destination at a later date. For this purpose, the altitude stored together with the coordinates would be regarded as the difference to the starting point and added or subtracted as a correction value when approaching the target near the destination. This corresponds to the procedure with analog altimeters.

Alternatively, the current air pressure at the destination sea-level (QNH) and the elevation of the destination (height above sea level) can be specified in order to correctly calculate the local altitude.
The test operation should show the best solution.

Unlike the analog altimeter, the airlogOne initially displays the altitude based on the starting point and only switches to the target altitude when approaching the target location (approx. 2.5 km). This is made clear by the altitude being displayed in italics.

AIRBORNE status

After the experiences of the first year, the procedure for detecting a jump has become somewhat more complex.
Previously, an altitude gain of approx. 30m/100ft at a speed of at least 10m/s was sufficient to detect a take-off for a jump. Why such a low altitude? Because we want to record the GPS position as close as possible to the starting point in order to be able to determine the exact location of the jump for the logbook.

However, this had lead to problems if, for example, the landing point is outside the jump area, a return journey is necessary and during that ride the altitude and speed limits are reached. The jump counter was then incremented 🙁

It now works differently: a “pending airborne” status is noted with the specified criteria: the logbook location and time are saved as before.
Now the jumper/airplane has 10 minutes to reach an altitude of 500m/1500ft, then the “pending” status becomes a valid “AIRBORNE” status, the jump number is counted up and a logbook entry is written.

WEBMODE & WiFi Manager

The new Wifi manager has been in use for a while now. It is faster and more universal as it can save up to 5 network credentials (SSID + password) internally.

If in WEBMODE, the device looks for a known WiFi and tests up to 5 access points one after the other to connect to an available network. If none of the networks is found, the airlogOne opens its own access point, i.e. a WiFi without a password.

In this case, please connect to this WiFi with your cell phone or computer and wait for the login screen. Here you can select one of the available WiFi-networks, enter the corresponding password and then save it in the AirlogOne. AirlogOne then connects to this network and the credentials for this network remains saved.
If you have trouble to open the “login-screen” in your browser, see the hints in the notes section.

Info: starting with software V2.5x, an attempt is made to connect to a “fallback network”. This network has no meaning for you, we use it to test the device before delivery.

Bring me home arrow

To find your way home, follow the direction marked by the big arrow next to the altitude. You need to set your HOME position before you enter the aircraft. This is done by pressing the SETDZ button after you have a valid GPS fix.

The distance to your home DZ is shown in km/mi by the number below. Next to it is your current groundspeed in the units you have selected in the dashboard app.

To interprtet the arrow correctly, hold the device with numbers readable into flight direction, f.i. holding your arm to the chest. Or position the airlogONE on your cheststrap, so the display always shows in flight direction. More on that in our blog GPS travel home arrow

syncing jump data

during a day of jumps, airlogOne logs all data and stores logbook entries plus detailed track information on its internal microSD card. This is a safe place for all your data. You can also remove the card from the device and makke back-up copies of the data. Please don’t change any files unless you are instructed to do so.

When in WEBMODE with a working internet connection, airlogOne will connect to the Firebase cloud that we use to store all your jump data for detailed analysis. The device starts to sync information: airlogONE will download configuration information and upload new jumps and tracks if available.

When syncing is finished, the screen gives a note and you can get back to normal use by pressing “M”. Its good practice to sync once each jump day.

NOTE: Syncing the device will also update wind data for the next 4 hours, if you have selected “WIND” in the configuration.
If you want to use the WindsAloft features all day, you should sync the device every 4 hours.

discipline screens

We recently started with the development of discipline-specific screens that summarize important information in a compact way.

These screens may change, evolve or disappear in the course of further software versions. We want to test various features, discuss with athletes of the disciplines, optimize them and then make them available for all as a built-in feature.

The general Alti/Tracker screen remains the standard screen.

However, there are also data compilations in the special screens where altitude display does not play a primary role.
If you want to test it, you should do some dry runs first. Feedback is – of course –always welcome!

selecting screens

The special screens can be selected using the M button. They are available for selection in the menu cycle after SHUT DOWN – WEBMODE – QUICK CONFIG. Once you have decided, you can also select a special screen as your start screen – select it in the Quick-Config menu – last item.
The device then starts with this screen when it is switched on.

Scott Screen

The SCOTT screen gives detailed numerical information about flight status and direction for Canopy Formation pilots

In the center is the unobstructed altitude in meters or feet. At the edges of the screen, different information is shown:

– top-right shows the GPS ground track of the skydiver in degrees.
– top-left shows the bearing to a given target.
– bottom-right shows the distance to the target.
– bottom-left shows ground speed.

CP Screen

The SP Screen gives information for approaching a (virtual) target at a 3D position: this position has geocoordinates (LAT / LON) and an altitude. The direction to this target is indicated – as usual – with a direction arrow on the display (relative bearing).

The level bubble shows the best glide path to the destination: the angular deviation on the way to the destination is displayed, limited to +- 30 degrees. The pilot’s task is to bring the circle to the center of the coordinate cross. In this position, the direction and glide ratio match perfectly: the destination is reached by the fastest route at the selected altitude.

INSIGHT: truemove

In addition to barometric pressure and position sensors (GPS), airlogONE contains a complete AHRS = Attitude & Heading Reference System.

This is used to record the exact orientation of the device – or – if fixed to the jumpers body – the jumper. You surely know an AHRS as a Playstation or Wii controller that follows all your movements on the screen. It can also be used to take precise acceleration and rotation measurements.

This is formation is tracked with your GPS position data and all the speeds, giving a detailed data base for post-jump analysis. This is unique functionality that no other skydiving device can deliver. 

It opens up completely new possibilities: Attached to the wrist, the orientation of the device can be captured to convert acceleration readings from device coordinates to the axis of motion in world coordinates.
Attached to the body, it collects all body movements that can be correlated with the change in flight parameters (speed, sink, turns, time, etc.

We’re currently working on specialized analysis tools for various disciplines that can be used with the  dashboard software airlog.app.

windsaloft.us

airlogONE can use the Internet connection to contact the windsaloft.us website in order to obtain and save layered wind data for the current location inside the device.

Current wind data and the forecast for the next 4 hours are obtained.

With this data, the wind direction and speed are appended to the track file in height increments of 100m/300ft to enable a corresponding wind display in airlog.app TrackView.
At a later stage, this data can be used to calculate the possible reach for the canopy flight.

resetting jump#

JumpNr reset is possible via airlog.app software: set jumpNr in dasboard app to “-1” and sync with the airlogOne. This resets the jump counter to zero.
Then set the JumpNr in the dashboard to the desired value and sync again.
Caution: this can result in overwriting logbook entries, so be careful!
– works only in SW > V3.1x

Notes

No on/off switch:

we are using an e-paper display, that looks in power-off state as if powered on. We want to make sure we know the battery status of the device to switch to a “recharge me” screen before the device is completely off.
Thats why we go to “sleep” only, waking-up every 4hrs, checking battery and sleep again, until battery status is so weak we have to change the screen to recharge!

missing login-screen

When the airlogOne shows a screen message: connect to network „AIRxxxxx“ and no portal page/Pop-up window appears, you need to help the browser:
This is acommon problem, since browsers try to NOT open such windows. Try to enter “http://localhost“ in your browser., try another browser or close/open the browser. Fortunately, usually you have to do this only once.
Some background information under this link: open-wifi-login-page